Scheduling GPU Pods on Kubernetes
A GPU node won't run your Pods until a device plugin advertises it. How Kubernetes discovers GPUs, how to share one across Pods, and where scheduling breaks.

The first time you try to serve a model on your own GPU node, the failure is quiet. You add a node with a shiny accelerator in it and deploy a Pod that asks for a GPU. The Pod sits in Pending, and kubectl describe says Insufficient nvidia.com/gpu. The node is right there with the card plugged in, and the scheduler insists it has nothing to give you.
Nothing is broken. Kubernetes just does not know the GPU exists yet.
This post is for engineers who run their own inference or training on Kubernetes instead of renting a hosted endpoint. It covers how Kubernetes discovers GPUs, how to request one, how to share one card across Pods, how to keep GPU nodes for GPU work, and where scheduling breaks. I have spent a good amount of time on the Kubernetes and ArgoCD side of CMS workflow operations at CERN, and separately on serving LLMs for Archi, the retrieval copilot. GPU scheduling sits between those two worlds. It trips people up because accelerators are scheduled differently from CPU and memory, in ways that are not obvious until a Pod refuses to run.
Kubernetes needs a device plugin to see GPUs
The scheduler natively understands two resources: CPU and memory. It has no built-in concept of a GPU, an FPGA, or any other accelerator, and that is by design. Instead of baking every vendor’s hardware into the core, Kubernetes provides a device plugin framework. The vendor ships a plugin that teaches the node about its own hardware.
For NVIDIA cards, that plugin is the k8s-device-plugin. It runs as a DaemonSet, so a copy lands on every GPU node. The plugin does three things:
- discovers the cards;
- reports their health to the kubelet (the agent that runs Pods on each node);
- registers them as an extended resource named
nvidia.com/gpu.
Once that registration happens, the node’s capacity gains a new line, visible in kubectl describe node:
$ kubectl describe node gpu-node-1
Capacity:
  cpu:             32
  memory:          257638Mi
  nvidia.com/gpu:  4
Allocatable:
  nvidia.com/gpu:  4
That nvidia.com/gpu: 4 is the whole trick. The scheduler treats it like any other countable resource. It places a Pod that requests one GPU only on a node that still has a free one, and it decrements the count as Pods bind to the node. The diagram below traces a request from the card in the chassis to a bound Pod.
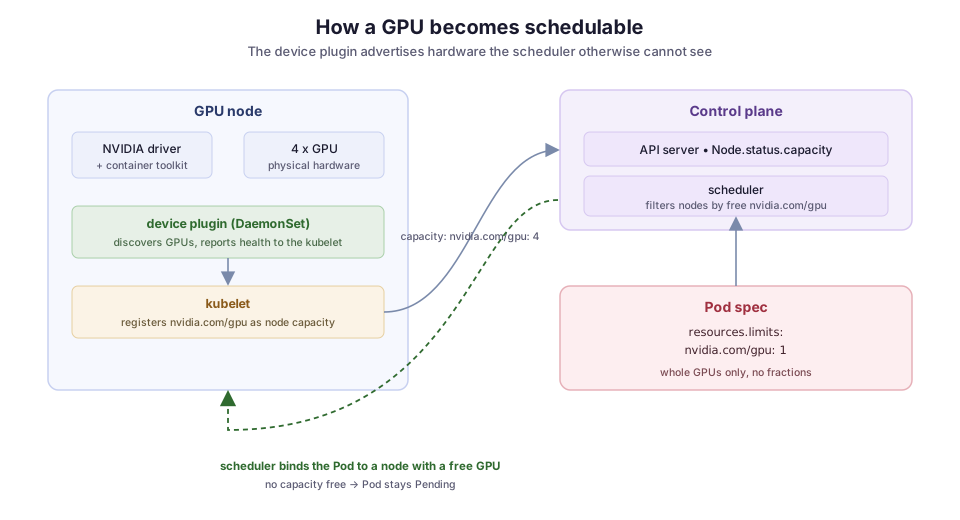
The plumbing under the plugin still has to be right. You need the NVIDIA driver on the host, and a container runtime configured to inject the GPU into the container. On a fresh cluster, the sane path is the GPU Operator. It installs the driver, the container toolkit, the device plugin, and node labelling together, instead of leaving you to line up versions by hand.
Requesting a GPU in a Pod spec
Requesting a GPU looks almost like requesting CPU, with one rule that catches people. Extended resources cannot be overcommitted, so a GPU’s requests and limits must be equal. In practice you set only the limit, and Kubernetes copies it into the request, as in this Deployment for a vLLM server:
apiVersion: apps/v1
kind: Deployment
metadata:
  name: vllm-server
spec:
  replicas: 1
  template:
    spec:
      containers:
        - name: server
          image: vllm/vllm-openai:latest
          resources:
            limits:
              nvidia.com/gpu: 1 # request is set to match automatically
Two more constraints follow from the extended-resource model:
- The count must be a whole number. You cannot ask for
0.5. - A GPU is exclusive to one container by default. There is no cgroup-style time-sharing like there is for CPU. One Pod gets one card, until that Pod goes away.
That default is safe, and for a training job it is what you want. For inference it is often wasteful. A 7B model quantized to fit in 16GB leaves most of an 80GB card idle, and you are paying for the whole card.
Sharing one GPU across Pods
To put more than one Pod on a card, you have to opt into a sharing mode. The device plugin supports three, and each trades isolation for utilization differently. I have gone back and forth on this decision more than any other, so here is concretely what each mode gives you.
Time-slicing is the loosest. You tell the plugin to advertise a GPU as, say, four replicas, and it hands out nvidia.com/gpu four times. The CUDA contexts (each process’s GPU state) take turns on the hardware.
- Pros: cheapest to turn on, and needs no special silicon.
- Cons: no memory isolation and no fairness guarantee. One Pod that allocates all the VRAM makes its neighbours fail with out-of-memory errors, and one heavy kernel stalls the others.
Time-slicing is good for bursty, trusted, low-stakes workloads, and bad anywhere a noisy neighbour is a real problem.
MPS, NVIDIA’s Multi-Process Service, puts a control daemon in front of the card. Processes then share the card with some memory and compute partitioning, instead of blindly taking turns. It is a step up in isolation from time-slicing. As of v0.15.0, the device plugin still marks MPS support as experimental. Time-slicing and MPS are mutually exclusive: you pick one per node.
MIG, Multi-Instance GPU, is a true hardware partition. On A100, H100, and newer data-center cards, the hardware splits into isolated instances, each with its own memory and compute slice. The plugin advertises them as distinct resources such as nvidia.com/mig-1g.5gb. A Pod pinned to one MIG slice cannot touch another slice’s memory.
That isolation is exactly what you want for multi-tenant serving. The cost is rigidity. You carve the card into fixed profiles ahead of time, and a workload that needs slightly more than one slice cannot borrow from the slice next door.
My rule of thumb:
- MIG when tenants do not trust each other, or when you need predictable latency.
- Time-slicing when it is your own batch of small jobs and you just want the card busy.
- MPS rarely, and only after testing.
Keeping GPU nodes for GPU work
Advertising the GPU is half the job. The other half is keeping ordinary Pods off your expensive nodes, where they would crowd out the workloads that actually need the card. A stateless web Pod has no reason to sit on an H100 box, but the scheduler will put it there if the node has spare CPU.
The clean fix is a taint on the GPU nodes. A taint repels every Pod that does not explicitly tolerate it. This command taints one node with NoSchedule:
kubectl taint nodes gpu-node-1 nvidia.com/gpu=present:NoScheduleNow only Pods that carry the matching toleration (your inference and training workloads) can schedule there. The GPU Operator can apply this taint for you.
It pairs well with the node labels from GPU Feature Discovery, such as nvidia.com/gpu.product, memory, and MIG profile. With those labels, a Pod can use nodeAffinity to target, say, only the A100 nodes. Use the taint to keep the wrong things off, and affinity to steer the right things to the right card.
Where it breaks
A few failure modes show up again and again, and none of them announce themselves clearly.
Pod stuck in Pending with Insufficient nvidia.com/gpu. Either the device plugin is not running (or not healthy) on any node, or every GPU is already claimed. First check kubectl get pods -n kube-system for the plugin DaemonSet, then check the Allocatable count on the nodes. This is the failure I opened with, and nine times out of ten the plugin never came up.
Driver, toolkit, and CUDA version skew. The container’s CUDA runtime has to be compatible with the host driver. Get this wrong and the container starts fine, but the first CUDA call fails at runtime with an unhelpful error. This class of bug wastes hours, which is exactly why pinning all of it through the GPU Operator is worth it.
GPU out-of-memory does not behave like a Kubernetes OOMKill. When a container exceeds its RAM budget, the kernel’s OOM killer steps in and Kubernetes reports OOMKilled. I wrote about that mechanism in requests vs limits. GPU memory is not tracked by cgroups, so exhausting VRAM triggers none of that. Your process just throws a CUDA out-of-memory error and dies, and the Pod may restart straight into the same wall. Container memory limits do nothing to protect the card. If you serve LLMs, budgeting VRAM is on you, and the KV cache is usually where it goes.
Time-sliced neighbours starving each other. Time-slicing gives no isolation, so one Pod can quietly degrade every other Pod on the card. If you turned on sharing and latency got strange, rule this out first. Also remember that a readiness probe checks whether the process answers, not whether the GPU behind it is healthy. A slice can be thrashing while the probe stays green.
What I would do differently
If I set this up again from scratch, I would use the GPU Operator on day one instead of installing the device plugin alone. The standalone plugin is fine once the host is prepared. But “once the host is prepared” hides the driver and toolkit version matching that eats an afternoon.
I would also choose the sharing model before writing any manifests. Retrofitting MIG onto a cluster that assumed whole-GPU allocation means re-tagging nodes and rewriting resource requests across every workload.
The mental model that keeps it all straight comes down to three facts about a GPU on Kubernetes:
- It is a countable extended resource that vendor code must advertise before the scheduler can hand it out.
- It is exclusive unless you deliberately make it shareable.
- When you share it, you lose isolation guarantees, and accounting for that is your job.
Everything above follows from those three facts.
Most of what I ran day to day was CPU-bound grid work for the CMS experiment, but the moment you self-host a model, which is where Archi lives, this is the layer you end up owning. Get the accounting right and the rest of the stack behaves.